Sunday, March 31, 2013

Nap Time Activities

The Quiet Busy Book

Nap time sometimes seems a bit long for some of the children in my class; usually because they only sleep for half of the time or less. The children do have books they can read after resting. This helps to keep them occupied while the others sleep. However, it seems that some need to trade their books frequently to stay quietly engaged. I have come up with a solution to help them---a quiet busy book. Often these are sewn books of different activities. Unfortunately, I don't have a sewing machine for this project. Instead I made it all free hand out of construction paper. It took some time, but it has been well worth it. The kids are already asking if I can make more!


The front and back cover were made using construction paper crayons on yellow construction paper. Each page was laminated for durability. To make the pages back to back, they were hole punched and sewn together using a whip-stitch. Three holes were also punched along one side to bind the book via 1.5" rings.


This two page spread has a ladder on each page where each rung has a different number of beads on it. The rungs are made of yarn that were threaded through pinholes. They are secured with both knots in the back and hot glue on the front. The beads encourage counting practice, early math addition and subtraction, and pattern recognition. They also allow fine motor practice by sliding the beads along the rung.


This busy bee activity lets kids help the bee travel to all of the flowers. This helps to build fine motor skills by winding the yarn around each flower. It also promotes critical thinking skills as they try to reverse the path the bee took.


The bee was made using a clip art picture online. The image was duplicated and reflected, so it would be the same on both sides. It was laminated, cut to size, folded in half and secured with double sided tape around the yarn. The yarn was measure by winding it through all the flowers then attached to one page. The flowers are buttons that are held in place using yellow pipe cleaners.


The artist easel page helps children learn colors and builds imagination. Here they can take  a real paintbrush and pretend to paint a beautiful picture!


This is Mr. Potato Head page. The pocket houses all the pieces needed to bring the potato to life. It has the black bowler hat, green cap, blue shoes, red shoes, yellow glasses, regular eyes, sad eyes, angry eyes, ears, nose, mustache, tongue, toothy grin, lips, and arms. It was a lot of fun drawing and creating the pieces for this page.


This book has helped many kids in class contain their wiggles, allowing their friends to nap peacefully. It has aided in making relaxing and productive nap times. I hope to make others soon!

Once Upon a Time

Billy Goats Gruff Hat

We made hats to wear as we read The Three Billy Goats Gruff


The materials used were 
  • big sheets of construction paper cut into 2" x 18"
  • string to secure the hat
  • hole puncher
  • marker
  • tape
  • grey construction paper

Fold the grey paper in half and draw a horn shape on it. The children will get great fine motor skill practice cutting this out.


Make sure each child writes his/her first name on the band followed by Gruff. This way everyone will be a billy goat Gruff when the project is complete.


Tape the horns to the inside of the band. Try to make sure the horns are pointing up. A couple children ended up making billy goat Gruff ears and no horns. We accepted this as choosing to be the littlest billy goat Gruff.


Use the hole punch to create secure points to tie the string to. Now the hat can be adjusted to fit anyone!


The kids really got into this project and were braying around the room as goats for the rest of our Open Centers time. 


Once Upon a Time

Rapunzel Tower

We focused on princess stories for a week and one of our projects was to make a Rapunzel Tower.


Here is our material list:

  •  toilet paper tubes
  •  grey construction paper (cut in half)
  •  black construction paper (cut in 4" circles)
  •  Face-colored construction paper (cut in thumb-size circles)
  •  Yellow yarn (12" sections folded in half twice and knotted)
  •  colored pencils
  •  tape
  • double-sided tape.

First, we attached the grey construction paper to the tube, rolled it up, and secured it with tape. Kids were given time to decorate their tower at this time, if they wanted.


Next, Rapunzel's face was drawn on her head. The head was double-sided taped to the tower.  The hair section was also secured to the tower with double-sided tape.


The roof of the tower was made using the black circle. A line was drawn and cut on the radius (outside to the center of circle). Then, the circle overlapped itself to form a cone. This was fastened with tape and set on the tower. 


We now had a forest of Rapunzel towers. Boy and girls in the class had fun making this project.


Once Upon a Time

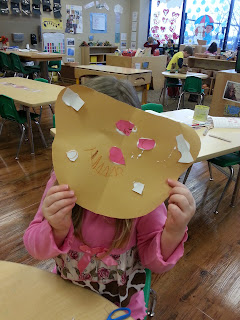
Three Bears Symmetry Masks

We made symmetrical bear masks, in honor of the the story Goldilocks and the Three Bears


Here are the supplies we used: glue, scissors, crayons, brown/tan construction paper, scrap paper, bear head stencil.


A tracing template was made for half a bear head. This made the children fold their paper in half and then practice tracing. 


Next, the bear head was cut out and opened. We discussed how the two sides looked the same --- were symmetrical. 


We talked about what else is on the face (eye, nose, mouth) and where it should be placed.


Children used scrap paper squares and crayons to make the facial features. Some chose to cut the squares into other shapes.


 The overall result were bears that were fairly symmetrical.

Once Upon a Time


Favorite Fairy Tales

We took a poll of all the students' favorite fairy tale stories. It was documented on a dry-erase board. 


Then using brown butcher paper and white poster board, a book background was made. Then various colors of construction paper was cut down to 2'' x 3'' sections. A black permanent marker was used to make them look like books. Each color represented one story. Each child then came up and wrote his/her name on a "book". 


Next, each title was placed along the bottom of the board. The "books" with the children's names were glued above the title. The overall effect is a glyph graph showing some of the favorite fairy tales in class.

Friday, March 8, 2013

Once Upon a Time

3 Little Pigs House

Which would you build?


As we read the story of The Three Little Pigs, we discussed which material they would like to build a house from. 


The houses were made using milk cartons that were cut in half and cleaned. Each child chose a preferred building material: brick (red paper rectangles), sticks (craft sticks), or straw.


The cartons were painted with glue and building materials added. Each house had its own green grass base to prevent the foundation from sticking to the table.

Once Upon a Time

Theme Books

5 Day Read Aloud Books

Whenever possible, I try to incorporate an author study into a theme. For the theme Once Upon a Time, James Marshall retold and illustrated several classic fairy tales. We focused on a one book a week for the duration of the theme.